Home temperature monitoring with Raspberry Pi - first post


My son Mads and I have been working on a project the last six months, involving a Raspberry Pi, temperature measuring electronics, a CoucDB database and a web user interface.
We actually have something to show now, and I feel a need to put it out there. I'm proud of what we have made.
Goal
The end goal is to have a Raspberry Pi PC with an attached monitor placed some place in the house, displaying what the current temperature is in multiple rooms and outside, and also showing graphs of temperature change within the last 24 hours.
Byt why?
Several geek friends have asked me why we build this from scratch. What we are creating here can be bought as a finished product or with parts that are much more easy to get working.
The reason for this being DYI is that I want my son to get hands on with creating a tech product. Coding python, html and JavaScript, soldering eletronics, configuring a database and operating system. I want him to run into problems and fix them.
Just like in the real world, where tech products are made.
And why do I want this? To make him something more than a good user of tech.
This is also why the Raspberry Pi Foundation originally created the Pi computer: Raspberry Pi's Eben Upton: we need to create a generation of producers not consumers.
Being a user is fine. Understanding what makes a tech product work positions you to be something more.
What we have
What we do have now is a Raspberry Pi that measures temperature every minute, puts the measurement in a CouchDB database, and we have a web page that displays the current temperature, read from the database.
The web page is accessible from any PC or smartphone attached to out home WiFi.
Next
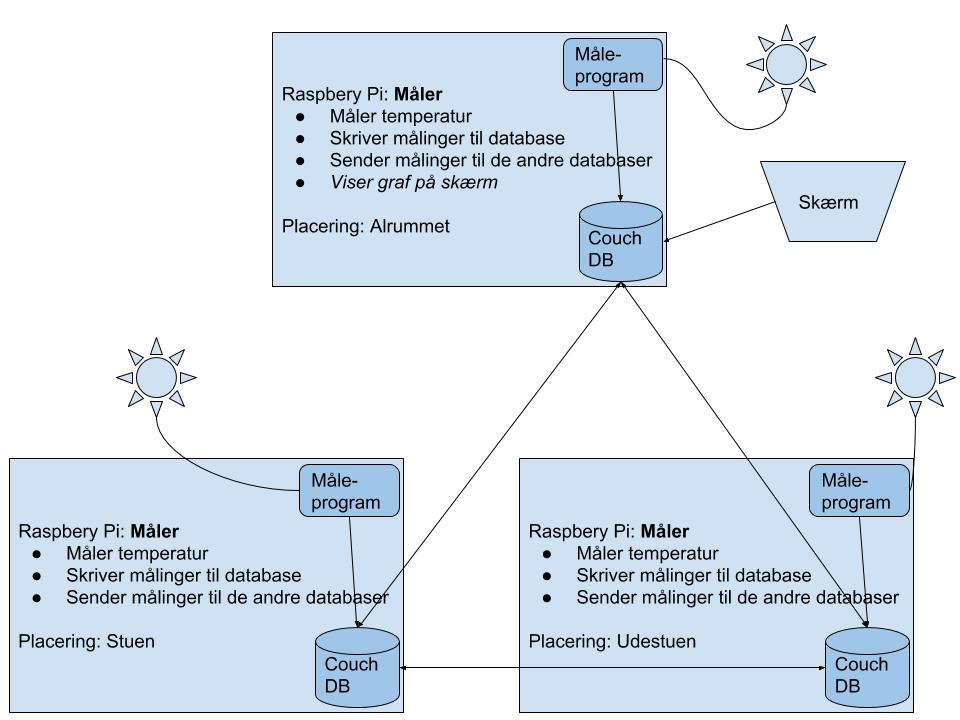
What comes next is adding more Raspbery Pies to the setup.
Each Raspberry Pi will be running exactly the same set of software.
Each Raspberry Pi will be putting its own measurements in the database on the local device.
Because we are using CouchDB, we know it will be extremely easy to make all the Pies exchange their measurements. Each Pi will have all the measurement data that has been created across all the Pies.
Because all the Pies have all the data, any Pi can have a monitor attached that shows the user interface we will be building.
High level overview of what we have done
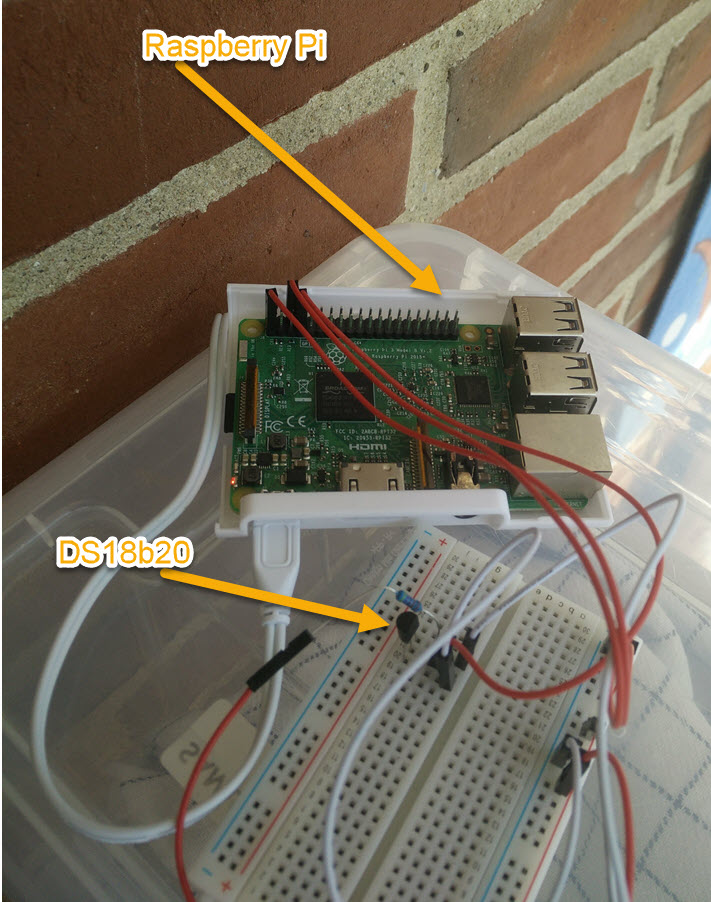
We started off by installing Raspbian as the operating system on the Raspberry Pi (model 3).
Then we attached a DS18b20 to the Pi. This is a small three-legged piece of electronics. This little thing will, when you do the right things to it, make a file available on the operating system. The file contains the current temperature.
We made use of an excellent tutorial: DS18B20+ One Wire Digital Temperature Sensor and the Raspberry Pi
The same tutorial helped us creating the Python code that measures the current temperature every minute.
Then we installed CouchDb. CouchDB is a database that has JSON as its data sctructure. CouchDB has built in functionality that will let multiple installations replicate their data. This gives us backup and it lets us have all the data in one place for when we need to build the user interface that shows data from all the 3-6 Pies we will end up with having up and running.
We used this instruction to learn how to install CouchDB: CouchDB 2.1 on Raspberry Pi (Raspbian Stretch)
Having the database up, we modified the Python code that measures temperature, making the same code write its measurements to the database.
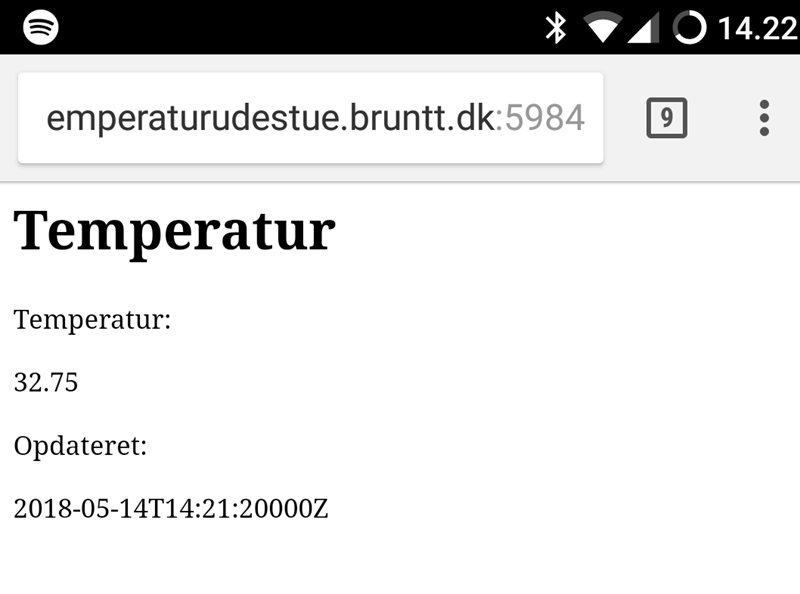
Finally we could look at creating a web page that would display the current temperature. Pulling the temperature from the CouchDB.
CouchDB has a REST/JSON API, making it relatively easy to pull data from the database.
Code is here:
Measurement-code (Python)
import os
import time
import couchdb
import datetime
import json
#import sys

#print (sys.path)

os.system('modprobe w1-gpio')

os.system('modprobe w1-therm')
temp_sensor = '/sys/bus/w1/devices/28-05169040e5ff/w1_slave'
couch = couchdb.Server()
db = couch['temperatur']

date_handler = lambda obj: (
	obj.isoformat()
	if isinstance(obj, (datetime.datetime, datetime.date))
	else None
)

def temp_raw():

	f = open(temp_sensor, 'r')
	lines = f.readlines()
	f.close()
	return lines

def read_temp():

	lines = temp_raw()
	while lines[0].strip()[-3:] != 'YES':
		time.sleep(0.2)
		lines = temp_raw()

	temp_output = lines[1].find('t=')

	if temp_output != -1:
		temp_string = lines[1].strip()[temp_output+2:]
		temp_c = float(temp_string) / 1000.0
		temp_f = temp_c * 9.0 / 5.0 + 32.0
		return temp_c

while True:
		temperatur = read_temp()
		print(temperatur)
		#tid = (json.dumps(datetime.datetime.now(), default=date_handler))
		tid = datetime.datetime.now().strftime('%Y-%m-%dT%H:%M:%S000Z')
		doc = {"rum": "alrum","datotid": tid,"temperatur": temperatur}
		db.save(doc)
		time.sleep(1)
Web UI code
<html>
<META HTTP-EQUIV="refresh" CONTENT="60">
<body>
<h1>Temperatur</h1>
<script>
fetch('http://temperaturudestue.bruntt.dk:5984/temperatur/_design/datoTemperatur/_view/datoTemperatur?descending=true&limit=1',
{
	mode: 'cors', // no-cors
}
)
  .then(function(response) {
	return response.json();
  })
  .then(function(myJson) {
	console.log(myJson);
	document.getElementById("temperaturher").innerHTML = myJson.rows[0].value;
	var d = new Date(myJson.rows[0].key);
	console.log(d);
	document.getElementById("temperaturtidher").innerHTML = myJson.rows[0].key;
  });
</script>

Temperatur: <p id="temperaturher"></p>
Opdateret: <p id="temperaturtidher"></p>
</body>
</html>